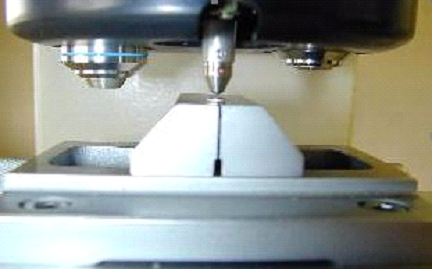
Figure 1 (above): An electrical contact being tested for hardness with a Vickers hardness indenter
Electrical contact materials must be produced with specific and consistent material properties to ensure they perform well in an application. Variation in characteristics such as conductivity, density, or even surface roughness can cause an electrical contact to fail. This can result in a potentially dangerous, even life-threatening situation. As such, it is important that electrical contact manufacturers hold their quality standards to a very high level and perform quality inspections throughout the production program consistently.
One important characteristic that must be monitored closely is hardness. Electrical contacts must be designed to withstand significant contact pressures, especially in medium to high voltage applications. Hardness plays a crucial role in a contact’s ability to withstand these pressures. If a contact is too soft, it can be prone to irreversible plastic deformation which will alter the function of the contact (at best) or cause the contact to fail completely (at worst). If a contact is too hard, it might crack under these loads or it might not have sufficient asperity* when contact is made. There is a middle ground of hardness values where the contact will not exhibit plastic deformation and it will not crack, chip, or have excessive contact resistance due to low asperity.
*Asperity is the amount of surface area that is in contact with the counterface. Since all materials have some degree of surface roughness, not all of the contact’s surface will be touching the counterface when contact is made. When asperity is low, contact resistance can increase which is problematic for many reasons.
DEFINING HARDNESS
We now see that hardness is a critical material property of electrical contact materials. But what is hardness exactly? Of course, we all know that a bowling ball is harder than a tennis ball, but how do we quantify exactly how much harder? The answer isn’t necessarily straightforward. There are many different types of hardness tests and hardness scales, each reserved for different materials. Technically, there is no one scale that can be used for all materials, so it is important to ensure the correct scale is being used for the material that is tested. With all that said, all types of hardness tests and scales are intended to quantify one thing – a material’s ability to resist deformation.
To properly understand exactly what hardness means, we must first look at something called the “Stress-Strain Curve”. This curve shows the relationship between stress and strain, both of which are defined below:
Stress: a measurement of force applied to an object divided by the area over which the force is acting
Strain: the amount of deformation experienced by an object under load in a particular direction divided by the original length of the object in that dimension.
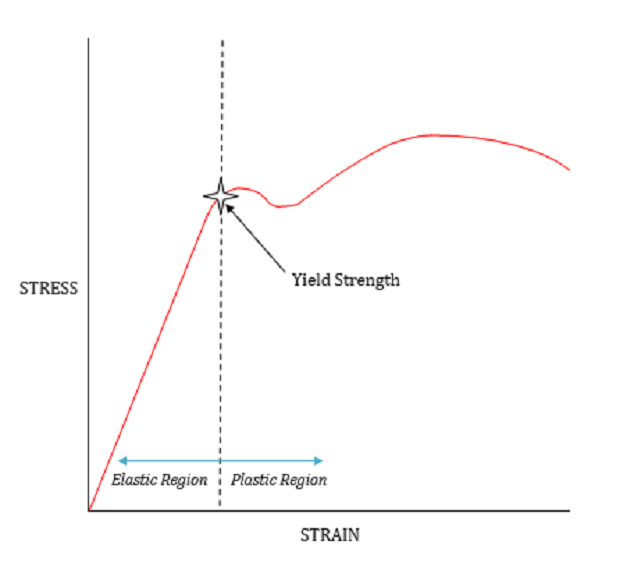
For most materials, when the relationship between stress and strain is shown on a graph, it looks something like the chart shown in Figure 2.

Figure 2: The Stress-Strain Curve shows how stress within a material changes as strain is increased.
Below a certain strain value, the material behaves elastically, meaning it retains its original shape and form after a stress is applied as long as the stress does not exceed the material’s yield strength. This region of the stress-strain curve is called the elastic range. For electrical contacts, it is important that the material stays in the elastic range throughout operation. Once it crosses over into the plastic region, the material will undergo irreversible hardness and dimensional changes that may affect the contact’s function.
A material’s hardness is approximately correlated to its yield strength. It is important to note here that hardness is not solely dependent on yield strength and thus, cannot be considered a direct equivalent. Hardness also depends on other parameters such as Young’s modulus, fracture strength, ductility, stiffness, toughness, and viscoelasticity. As a result, hardness only provides an approximation of a material’s relative ability to resist plastic deformation. It is helpful nonetheless to use hardness as a standard in manufacturing since it is much more efficient to generate a hardness value than to generate a stress-strain curve.
MEASURING HARDNESS
There are two main methods by which hardness values can be obtained – indentation hardness and rebound hardness. Both methods serve a purpose in modern industry, but indentation hardness is the prevailing standard for many metallurgical applications, including electrical contacts.
Indentation hardness can be obtained by doing exactly what the name implies – indenting the material. Typically, this involves pushing a rounded diamond tip of specified dimensions into the material using a specified load. The hardness tester can detect the depth of penetration and, using the known load and indenter dimensions as inputs, determine the hardness value. Common indentation hardness scales include Vickers, Brinell, and Rockwell, each of which have different scales within them. These scales are defined by the load and indenter used. As mentioned earlier, not all scales can be used for all materials – one must be sure they are using an appropriate scale for the material being tested to obtain reliable results.
A less common method to determine hardness is through rebound hardness testing. Like indentation hardness, a rebound hardness test unit relies on a rounded diamond tip. However, the tip doesn’t necessarily pierce the material as it does with indentation hardness. Rather, it is bounced off the material from a specified height. The distance it rebounds off the surface can be correlated to a certain hardness value. Thus, the hardness is dependent on the material’s coefficient of restitution, or its ability to deflect a colliding object with minimal energy loss. This type of testing is non-destructive and easy to implement, although it is arguably less reliable than an indentation hardness test. Common rebound hardness test scales include Shore and Leeb.
HARDNESS IN PRACTICE
By now, we know that hardness is an important quality metric that must be consistently monitored. In practice, although hardness testing is not necessarily a destructive test or difficult to implement, it is not always feasible to test every electrical contact from every batch. As a result, electrical contact manufacturers implement statistical process controls by which a statistically significant random sample from each batch of contacts is tested for hardness. This allows the manufacturer to ensure with a sufficient degree of certainty that the hardness of their contacts is within a specified range. On top of these statistical process controls, it is critical that manufacturers maintain their hardness testing equipment on a regular inspection & calibration schedule. Calibration is typically done by measuring a “control object” of known hardness to check that the instrument is providing consistent and accurate results.
SUMMARY: ELECTRICAL CONTACT HARDNESS IN A NUTSHELL
Hardness is just one of many material properties that electrical contact manufacturers monitor closely. It is an approximate measure of a material’s ability to resist deformation. There are many different hardness testing methods and scales, so it is important that the correct scale is selected for the material being tested. On top of this, manufacturers must ensure they are testing a sufficiently large, randomized sample of contacts from each lot to make sure they can catch potential defects. For more information, contact ECL directly with any questions or comments.